
Step 1 - Create a new experience
Redirect tests are triggered when users load the source URL. Begin by creating a new experience, and selecting 'Redirect' under the general section.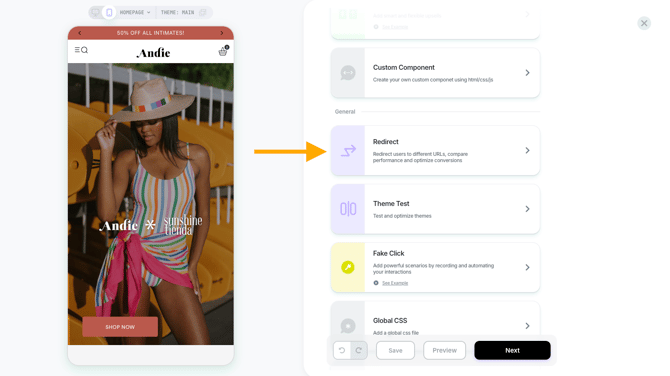
Step 2 - Set the redirect
- Specify the source URL and the destination URL for the redirect.
- Feel free to also define the 'Audience' and 'Devices' parameters, to scope this redirect only for specific use cases.
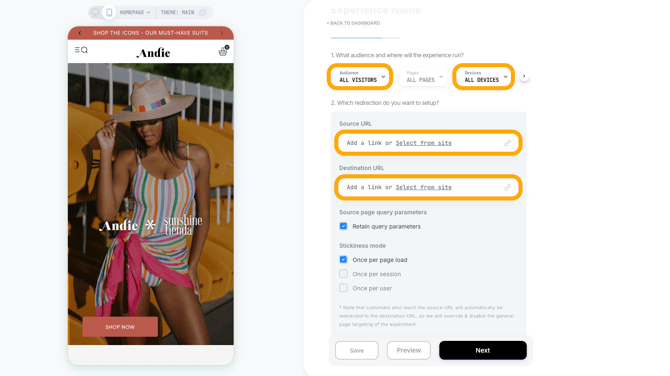

- Including URL parameters helps to control the source URL. If you added parameters to the source URL and then selected to include URL Parameters then the test would trigger only when the URL matches the parameters as well (meaning that specific URL + those parameters appear).
- If the box is unchecked, as long as that source URL is there, regardless of having any additional parameters, the test will be triggered.
- Let's say you wanted this test to trigger only for Facebook traffic. Then you would set the source URL to
https://[YOUR URL].com/?utm_source=facebookand check "select to include URL parameters.

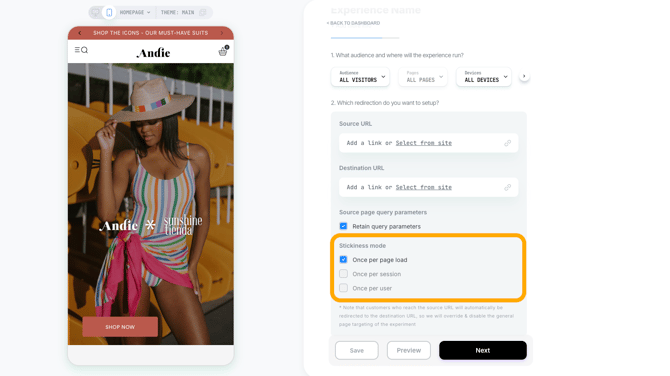
Step 3 - Final touches
Define the stickiness mode - aka. how often will the redirect occur:
- Once per page load - the redirect will always occur when the original URL is loaded.
- Once per session - the redirect will only occur the first time; if the shopper navigates and later returns to the original page, the redirect won't occur again.
- Once per user - the redirect will only occur once per shopper.
Once you have finished configuring the redirect, be sure to click the 'Save' button prior to QA and publishing.
You also have the option to perform an A/B test on your redirect, similar to other experiences on Visually.io, allowing you to evaluate its impact on your store's performance.
Test redirects on a draft theme preview
You can test a redirect on a Shopify draft theme by using a preview link. This is for QA only and does not make the redirect live for regular shoppers.
Important preview behavior:
When you open the preview link, two things may happen:
- Shopify loads the unpublished draft theme.
- Visually redirects the preview visitor to the destination page.
This redirect is real for anyone using the preview link, but it remains limited to preview traffic.
To test this, copy the redirect test preview link from Visually, then add the Shopify draft theme ID to the end of the URL as a query parameter.
&preview_theme_id=[SHOPIFY_THEME_ID]
Example using an anonymized Visually redirect test preview link:
https://example-store.com/products/example-product?lmi_preview=persistent-[EXPERIENCE_ID]&targeting=[TARGETING_TOKEN]&vsly_vid=[VISITOR_ID]&preview_theme_id=[SHOPIFY_THEME_ID]
When analyzing results for redirect experiences, make sure to only use Sessions with Impressions (SWI) or Users.
For further assistance or questions, reach out on the chat support widget or via support@visually.io.